• Blog
  • SHOP STAMPIN' UP!
  • JOIN MY TEAM
  • Recipe Project
  • About
  • Contact
Menu

Painted Orange

Charlet Mallett • Paper Crafter • Designer • Stampin' Up! Independent Demonstrator
  • Blog
  • SHOP STAMPIN' UP!
  • JOIN MY TEAM
  • Recipe Project
  • About
  • Contact
Frights & Delights Alternates (3 of 11).jpg

A Paper Pumpkin Thing Blog Hop - Alternates for Frights & Delights

September 27, 2018
39453350_10216697438326194_6195834969835700224_n.jpg
09-18_pp_homepage.jpg

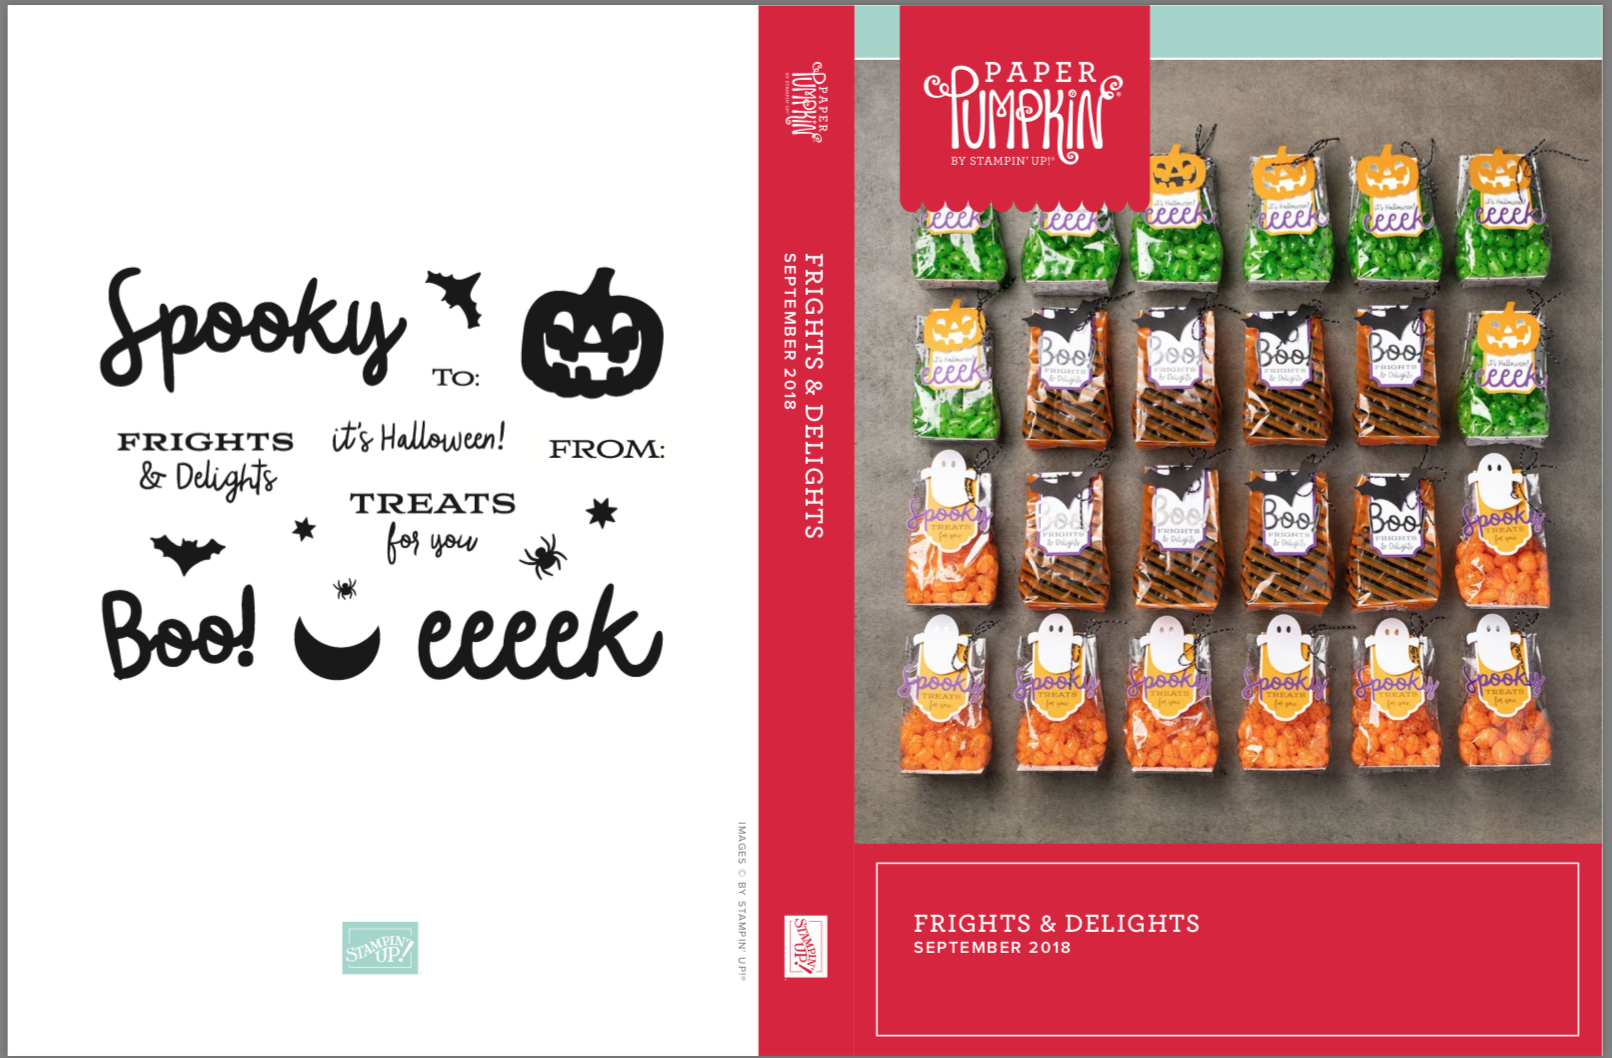
Welcome! Have you seen this months spooky and totally cute kit? It’s all about Halloween Treats, my favorite. The kit includes bags and toppers to make 24 treats. The stamp set is adorable and versatile. I decided to make a few mini 3x3 note cards and a tiny take out treat box as an alternate design using these supplies.

Frights & Delights 3x3 mini note cards - Paper Pumpkin Alternates - Charlet Mallett

Frights & Delights 3x3 mini note cards - Paper Pumpkin Alternates - Charlet Mallett

Frights & Delights 3x3 mini note cards - Paper Pumpkin Alternates - Charlet Mallett

Frights & Delights 3x3 mini note cards - Paper Pumpkin Alternates - Charlet Mallett

The kit includes die cut bats, ghosts and pumpkins. I decided to use the negative space from those die cuts to create a stencil mask.

IMG_2215.JPG
IMG_2216.JPG

We live in the woods, up a long driveway, and we don’t get many trick or treaters. Those who do make the trek up are rewarded well. Usually full size candy bars! I’m thinking of pairing a little notecard with the treat to gift to the parents who make that long trek.

Ready to see a few more great alternatives for this Frights & Delights Paper Pumpkin Kit.

Screen Shot 2018-09-23 at 9.04.38 AM.png

Paper Pumpkin is a monthly subscription craft kit full of goodness from Stampin' Up! Every kit includes a stamp set, supplies, ink and projects instructions. The designers participating in this hop take the monthly kit and put their own spin on the projects providing alternate ideas for you and various ways on how to use the kit supplies.

Are you a Paper Pumpkin subscriber? If not you can sign up here. Monthly kits at 19.95 USD (includes shipping).

Ready for some SPOOKY inspiration? If you are traveling this hop in order you just arrived from Kelly. Next up is Kimberly. See the full link up to this hop below and thanks so much for visiting!

Tags Paper Pumpkin, Frights and Delights
9 Comments
Dinosaur 1st birthday card using Birthday Backgrounds, Labeler Alphabet and No Bones About It - Stampin’ Up! - Charlet Mallett

Dinosaur 1st birthday card using Birthday Backgrounds, Labeler Alphabet and No Bones About It - Stampin’ Up! - Charlet Mallett

DANO DINO 1st birthday - Global Design Project Color Challenge - GDP157

September 24, 2018
39742775_10157775937117222_6793484041350807552_n.jpg

It’s so much fun to create a custom birthday card for someone specific. This card was created for our cousins 1st birthday. The family call him Dano Dino so the dinosaur themed card was evident. We celebrated Daniel last night with all sorts of fun dinosaur themed foods and decor.

This card uses the colors for this week’s Global Design Project #GDP157. This color palette is so pretty and would look amazing with fall themed cards.

This card also features three stamp sets: Birthday Backgrounds, Labeler Alphabet and No Bones About it (retired). I hand cut a number 1 from the Animal Expedition Designer Series Papers and built the card from there. Full supplies can be found below.

Check out what the Global Design Project created to see FANTASTIC inspiration and play along with us!

Dinosaur 1st birthday card using Birthday Backgrounds, Labeler Alphabet and No Bones About It - Stampin’ Up! - Charlet Mallett

Dinosaur 1st birthday card using Birthday Backgrounds, Labeler Alphabet and No Bones About It - Stampin’ Up! - Charlet Mallett

Inside of Dinosaur 1st birthday card using Birthday Backgrounds, Labeler Alphabet and No Bones About It - Stampin’ Up! - Charlet Mallett

Inside of Dinosaur 1st birthday card using Birthday Backgrounds, Labeler Alphabet and No Bones About It - Stampin’ Up! - Charlet Mallett

Couple of cuties getting crazy with cake. Happy Birthday Daniel.

IMG_2142.JPG
IMG_2141.JPG
Product List
Birthday Backgrounds Clear-Mount Stamp Set
[146446]
$18.00
Labeler Alphabet Photopolymer Stamp Set
[141936]
$17.00
No Bones About It Photopolymer Stamp Set
[138756]
$26.00
Animal Expedition Designer Series Paper
[146902]
$11.00
Faceted Dots
Faceted Dots
[146910]
$6.00
Whisper White 8-1/2" X 11" Card Stock
[100730]
$9.75
Mint Macaron 8-1/2" X 11" Cardstock
[138337]
$8.50
Blackberry Bliss Classic Stampin' Pad
[147092]
$7.50
Mint Macaron Classic Stampin' Pad
[147106]
$7.50
Grapefruit Grove Classic Stampin' Pad
[147142]
$7.50
Mini Stampin' Dimensionals
[144108]
$4.00
SNAIL Permanent Adhesive
[104332]
$7.00
Aqua Painters
Aqua Painters
[103954]
$17.00
In cards, challenge Tags Birthday Backgrounds, dinosaur card, No Bones About It, 1st birthday card, Labeler Alphabet, Global Design Project
Comment
Beautiful Promenade (1 of 19).jpg

Beautiful Promenade - Stampin' Up! Artisan Blog Hop

September 20, 2018
Artisan Logo.jpg

Hello again! Welcome to another Stampin' Up! Artisan blog hop. Today we are featuring the Beautiful Promenade stamp set, Beautiful Layers Thinlet dies and Petal Promenade Designer Series papers.

This product suite is super feminine, sophisticated and oh so striking. I love it. The Petal Promenade papers are full of gorgeous realistic photo floral arrangements and marble imagery. I created this ensemble of nursery decor and gift packaging for my cousin who is welcoming a new baby in October. The new little one is to be named Shannon Rose. I love it when baby names are predetermined. It sure does help with customizing. 

Beautiful Promenade 2a.jpg

When I first opened up the package of these Petal Promenade Designer Series Paper I knew I wanted to use one of floral sheets largely untouched. It screamed ‘frame me’! So that is what I did. I took my favorite sheet and framed it. I added the baby name (which I cut out using an e-cutter) and then adorned the framed with a few handmade paper flowers and stamped images from the Beautiful Promenade stamp set.

Beautiful Promenade (7 of 19).jpg

These paper flowers are fairly easy to make, just a little time consuming. I was shown how to make these little flowers over 10 years ago and have loved having this technique in my arsenal. BTW - I watched a little crime television in the background and the time flew by.

  1. Punch out circles. I used a 1” and 1.5” circle punch.

  2. Snip each circle once from the perimeter of the circle to the center of the circle.

  3. Glue down the two snipped ends to create a 3d petal.

  4. Arrange and layer these 3d petals to create a full flower. Use as few as 6 petals or as many as you’d like. Hide the snipped sides of each circle in the middle of the flower. Use a variety of circle sizes if desired.

  5. Fill flower centers with fringed flowers or embellishments.

  6. Optional: roll in Versamark and heat set with Gold emboss powder. Note - I dipped many of the flowers in Versamark after assembly and then sprinkled with Gold embossing powder. Embossing powder sticks to Versamark, so before or after, you’ll get pretty results.

paper flower 1.jpg
paper flower 2.jpg
paper flower 3.jpg
Beautiful Promenade (17 of 19).jpg

Again, these designs on the Designer Series Papers are the total stars of the show. I’ve used them to cover a few paper mâché nesting canisters and a ceramic monogram S. The nesting canisters are so functional. Inside are baby clothes, shoes and little socks. After opened, the canisters could be used in the nursery to house baby necessities.

Beautiful Promenade (18 of 19).jpg
Beautiful Promenade (11 of 19).jpg

Lastly I’ve created a matching card and tag to accompany the gift. The card, tag and frame also feature the ‘Making a Difference’ alphabet stamp set. I stamped the word BABY using this set. It appears the fonts in this alphabet stamp set work perfectly with the fonts in the Petal Promenade stamp set. I love how smart Stampin’ Up! is with product coordination!

Beautiful Promenade 1a.jpg
paper flower 1 dies.jpg

I shared this tip a while back and figured it was a great time to share again. The doily shape in the Beautiful Layers dies can be used to create four distinct shapes. Cut away following the straight lines in the shape to create a hexagon, octagon and polygon. I used a variety of these shapes on my projects today.

It’s an awesome feeling when a plan comes together. If ever there was a reason to go a bit over the top it’s welcoming a new life into the world. The entire ensemble was gifted in a basket and was well received. I love gifts made from the heart. I’ll post an instagram story of the entire package soon.

A full list of supplies can be found at the end of this post.

Thanks for visiting! Up next is fellow artisan Connie Collins. She always inspires and I‘ve seen a little sneak peak and am totally WOWed. In fact, this hop is stunning. Don’t miss it. Please know I appreciate YOU and all of your lovely comments. Have a great day!

 
Bloghop_Button.jpg
 

The Artisan Design Team is a group of international Stampin' Up! demonstrators
(16) chosen by Stampin' Up! to create exclusive projects for the company.

Sometimes links break. If this happens you can catch back up
with us by clicking on our blog homepage links below.

Cathy Caines
Charlet Mallett (YOU ARE HERE)
Connie Collins
Elizabeth Price
Emma Goddard
Jenni Pauli
Jennifer Frost
Jessica Winter
Kayla MacAulay
Kim McGillis
Lauren Alaird
Linda van Wely-Zwolle
Rhoda MacPherson
Sarah Lancaster
Susan Wong
Sylwia Schreck 

Are you Interested in purchasing Stampin' Up! products? I would LOVE to be your Stampin' Up! Demonstrator. If you live in the United States you can order your paper crafting supplies from my online store. So easy. THANK YOU!

Product List
Beautiful Promenade Photopolymer Bundle
[148389]
$45.00
Petal Promenade Designer Series Paper
[146913]
$11.00
Make A Difference Photopolymer Stamp Set
[146676]
$27.00
Petal Pink Stampin' Blends Markers Combo Pack
[147272]
$9.00
Calypso Coral Stampin' Blends Markers Combo Pack
[144045]
$9.00
Calypso Coral 8-1/2" X 11" Card Stock
[122925]
$8.50
Grapefruit Grove 8-1/2" X 11" Cardstock
[146972]
$8.50
Whisper White 8-1/2" X 11" Card Stock
[100730]
$9.75
Twine Baker's Whisper White
[124262]
$3.00
Gold Stampin' Emboss Powder
[109129]
$5.00
Boxwood Wreaths Embellishments
[144176]
$6.00
Calypso Coral Classic Stampin' Pad
[147101]
$7.50
Grapefruit Grove Classic Stampin' Pad
[147142]
$7.50
Versamark Pad
Versamark Pad
[102283]
$8.50
White Stampin' Emboss Powder
[109132]
$5.00
Mini Stampin' Dimensionals
[144108]
$4.00
SNAIL Permanent Adhesive
[104332]
$7.00
Whisper White 5/8" (1.6 Cm) Polka Dot Tulle Ribbon
[146912]
$7.50
Tag Topper Scalloped Punch
[133324]
$23.00
Gold Faceted Gems
Gold Faceted Gems
[144141]
$5.00
Metallic Brads
Metallic Brads
[146929]
$4.50
In cards, stampin' up! Tags Artisan Design Team, Beautiful Promenade
9 Comments
Charlet Mallett Instagram tip 2 artisan.jpg

Easy Ombré with Stampin' Blends

September 19, 2018
Charlet Mallett Instagram tip 2a.jpg

Hello! It’s so fun to see my work featured on the Stampin’ Up! Instagram and Facebook pages. It’s a nice perk to being an Artisan Design team member. I was featured this month on SU’s instagram showing how to use your Stampin’ Blends to create an easy ombré look.

“I love the look of ombré sentiments on cards. Create this awesome look quickly & easily using Stampin’ Blends. Choose shades of similar colors and roughly color your cardstock from light to dark. Blend colors together and then die-cut your sentiment. So fun!” I hope this idea inspired you to pull out your Stampin’ Blends and use them in a different way.

This card features the Thank You thinlet die and the Love You To Pieces stamp set and die bundle. A full list of supplies can be found below.

The Stampin’ Blends colors used for this pink Thank You:

Petal Pink light
Petal Pink dark
Flirty Flamingo light
Flirty Flamingo dark
Calypso Coral light
Calypso Coral dark

Charlet Mallett Instagram tip (6 of 13).jpg
Charlet Mallett Instagram tip (7 of 13).jpg

Another quick tip: Keep the puzzle die cuts in the die, add adhesive and then adhere to the card front before you remove the die. This will keep all the puzzle pieces together and make the assembly so much easier.

Charlet Mallett Instagram tip (13 of 13).jpg

Now let’s flip it! Same idea / technique but shown in greens. This card features Thank You Thinlet and the Tropical Chic stamp set and papers.

Which do you prefer, the pink or green version? Are you ready to give it a try? I’d love to see what you make. Tag me it you try it. Happy stamping.

Charlet Mallett Instagram tip 1 artisan.jpg
Charlet Mallett Instagram tip (11 of 13).jpg
Charlet Mallett Instagram tip 1a.jpg
Product List
Love You To Pieces Clear-Mount Bundle
[148396]
$39.50
Thank You Thinlits Die
[146832]
$18.00
Frosted & Clear Epoxy Droplets
[147801]
$9.00
Petal Pink Stampin' Blends Markers Combo Pack
[147272]
$9.00
Flirty Flamingo Stampin' Blends Markers Combo Pack
[147278]
$9.00
Calypso Coral Stampin' Blends Markers Combo Pack
[144045]
$9.00
Tuxedo Black Memento Ink Pad
[132708]
$6.00
Mini Stampin' Dimensionals
[144108]
$4.00
SNAIL Permanent Adhesive
[104332]
$7.00
Calypso Coral 8-1/2" X 11" Card Stock
[122925]
$8.50
Whisper White 8-1/2" X 11" Card Stock
[100730]
$9.75
Twine Baker's Whisper White
[124262]
$3.00
In cards, Artisan Design Team, stampin' up! Tags Thank You Thinlet, Ombre, Stampin' Blends, ADT2018, Artisan Design Tip, Artisan Design Team, adttipsandtricks
Comment
← Newer Posts Older Posts →
Water & ink. I used water and classic ink to create this soft pastel card. Paper: watercolor paper. I used a variety of flower punches from my collection to create the multi-layered flowers. This card has so much dimension and is meant for hand delivery! 🤣 Use your stash! #stampinup #useyourstash #cardmaker #cardmakingreel
When I think of pastel I think watercolor. For this month our 'Use Your Stash' theme is PRETTY PASTEL.  I pulled out the 'Good Greetings' stamp set and heat set the large greeting with white emboss powder. This greeting is so pretty. Then, I water pa
When I think of pastel I think watercolor. For this month our 'Use Your Stash' theme is PRETTY PASTEL. I pulled out the 'Good Greetings' stamp set and heat set the large greeting with white emboss powder. This greeting is so pretty. Then, I water painted a peachy color over the top for a soft & airy look. For the flowers I painted a few pink and peach multi-color washes and then punch out using various flower punches. The flower centers are irridescent rhinestones. Stampin' Up! products you can still purchase: Basic White cardstock, Fluid 100 watercolor Ink colors: Peach Pie, Pretty in Pink and Cloud Cover I can't wait to see what my friends pulled out from their stashes for this challenge. UYS is a monthly instagram hop where my friends and I get crafty and use what we have on hand to create a project around a certain theme. Use those supplies! Follow along below. @i.heart.stamps - You are here! @hammondandpenny @simple_stamper @bellestampinwithann @simplyfairies_kimfee @stampin_met_monique @vickiboucher @craftsomnia #useyourstash #papercraft #cardmaker #stampinup
Cute little chicks lined up in a row … I was eyeballing it to try my hand at stamp alignment with this new Stampin’ Positioner tool. My free form is not perfect, but it doesn’t matter in the end when you mount your card crooked. 🐥🐥🐥🐥🐥 🤣 Stamp set is called Easter Basket and it’s on the last chance list. Stampin’ Positioner tool coming May 5th #stampinup #cardmaker #cardmaking #cardmakingreels
Hey Chick! I used the sketch from #gdp542 as a starting point for creating this simple card. The cute chick does all the work, like usual! Play along with @global_design_project and create a project from our challenge sketch.  The little chick image
Hey Chick! I used the sketch from #gdp542 as a starting point for creating this simple card. The cute chick does all the work, like usual! Play along with @global_design_project and create a project from our challenge sketch. The little chick image is from the Easter Basket stamp set. The greeting is from the Sending Salutations stamp set. #stampinup #easterbasketstampset #cardmaking
Water & ink. I used water and classic ink to create this soft pastel card. Paper: watercolor paper.  I used a variety of flower punches from my collection to create the multi-layered flowers. This card has so much dimension and is meant for hand
When I think of pastel I think watercolor. For this month our 'Use Your Stash' theme is PRETTY PASTEL.  I pulled out the 'Good Greetings' stamp set and heat set the large greeting with white emboss powder. This greeting is so pretty. Then, I water pa
Cute little chicks lined up in a row … I was eyeballing it to try my hand at stamp alignment with this new Stampin’ Positioner tool. My free form is not perfect, but it doesn’t matter in the end when you mount your card crooked. 🐥
Hey Chick! I used the sketch from #gdp542 as a starting point for creating this simple card. The cute chick does all the work, like usual! Play along with @global_design_project and create a project from our challenge sketch.  The little chick image

All Stampin’ Up! images are copyright © 1990-2025 Stampin' Up!

Posts prior to 2013 can be found on charletswebsite

PAPER PUMPKIN  - SUBSCRIBE!

PAPER PUMPKIN - SUBSCRIBE!

Featured
IMG_2476.jpg
Sep 24, 2025
Halloween INSPO
Sep 24, 2025
Read More →
Sep 24, 2025
CraftRoulette-contribution-276.jpg
Jul 18, 2025
Craft Roulette! - Guest July 18th
Jul 18, 2025
Read More →
Jul 18, 2025
IMG_3118 6x6.jpg
Feb 20, 2025
I love you more than ... French Fries!
Feb 20, 2025
Read More →
Feb 20, 2025
Blog_Badge.jpg

Subscribe

Sign up with your email address to receive news and updates.

We respect your privacy.

Thank you!
Only Available at Scrapbook.com!
EVO Synthtic Paper

Powered by Squarespace