• Blog
  • SHOP STAMPIN' UP!
  • JOIN MY TEAM
  • Recipe Project
  • About
  • Contact
Menu

Painted Orange

Charlet Mallett • Paper Crafter • Designer • Stampin' Up! Independent Demonstrator
  • Blog
  • SHOP STAMPIN' UP!
  • JOIN MY TEAM
  • Recipe Project
  • About
  • Contact
Beautiful Promenade (1 of 19).jpg

Beautiful Promenade - Stampin' Up! Artisan Blog Hop

September 20, 2018
Artisan Logo.jpg

Hello again! Welcome to another Stampin' Up! Artisan blog hop. Today we are featuring the Beautiful Promenade stamp set, Beautiful Layers Thinlet dies and Petal Promenade Designer Series papers.

This product suite is super feminine, sophisticated and oh so striking. I love it. The Petal Promenade papers are full of gorgeous realistic photo floral arrangements and marble imagery. I created this ensemble of nursery decor and gift packaging for my cousin who is welcoming a new baby in October. The new little one is to be named Shannon Rose. I love it when baby names are predetermined. It sure does help with customizing. 

Beautiful Promenade 2a.jpg

When I first opened up the package of these Petal Promenade Designer Series Paper I knew I wanted to use one of floral sheets largely untouched. It screamed ‘frame me’! So that is what I did. I took my favorite sheet and framed it. I added the baby name (which I cut out using an e-cutter) and then adorned the framed with a few handmade paper flowers and stamped images from the Beautiful Promenade stamp set.

Beautiful Promenade (7 of 19).jpg

These paper flowers are fairly easy to make, just a little time consuming. I was shown how to make these little flowers over 10 years ago and have loved having this technique in my arsenal. BTW - I watched a little crime television in the background and the time flew by.

  1. Punch out circles. I used a 1” and 1.5” circle punch.

  2. Snip each circle once from the perimeter of the circle to the center of the circle.

  3. Glue down the two snipped ends to create a 3d petal.

  4. Arrange and layer these 3d petals to create a full flower. Use as few as 6 petals or as many as you’d like. Hide the snipped sides of each circle in the middle of the flower. Use a variety of circle sizes if desired.

  5. Fill flower centers with fringed flowers or embellishments.

  6. Optional: roll in Versamark and heat set with Gold emboss powder. Note - I dipped many of the flowers in Versamark after assembly and then sprinkled with Gold embossing powder. Embossing powder sticks to Versamark, so before or after, you’ll get pretty results.

paper flower 1.jpg
paper flower 2.jpg
paper flower 3.jpg
Beautiful Promenade (17 of 19).jpg

Again, these designs on the Designer Series Papers are the total stars of the show. I’ve used them to cover a few paper mâché nesting canisters and a ceramic monogram S. The nesting canisters are so functional. Inside are baby clothes, shoes and little socks. After opened, the canisters could be used in the nursery to house baby necessities.

Beautiful Promenade (18 of 19).jpg
Beautiful Promenade (11 of 19).jpg

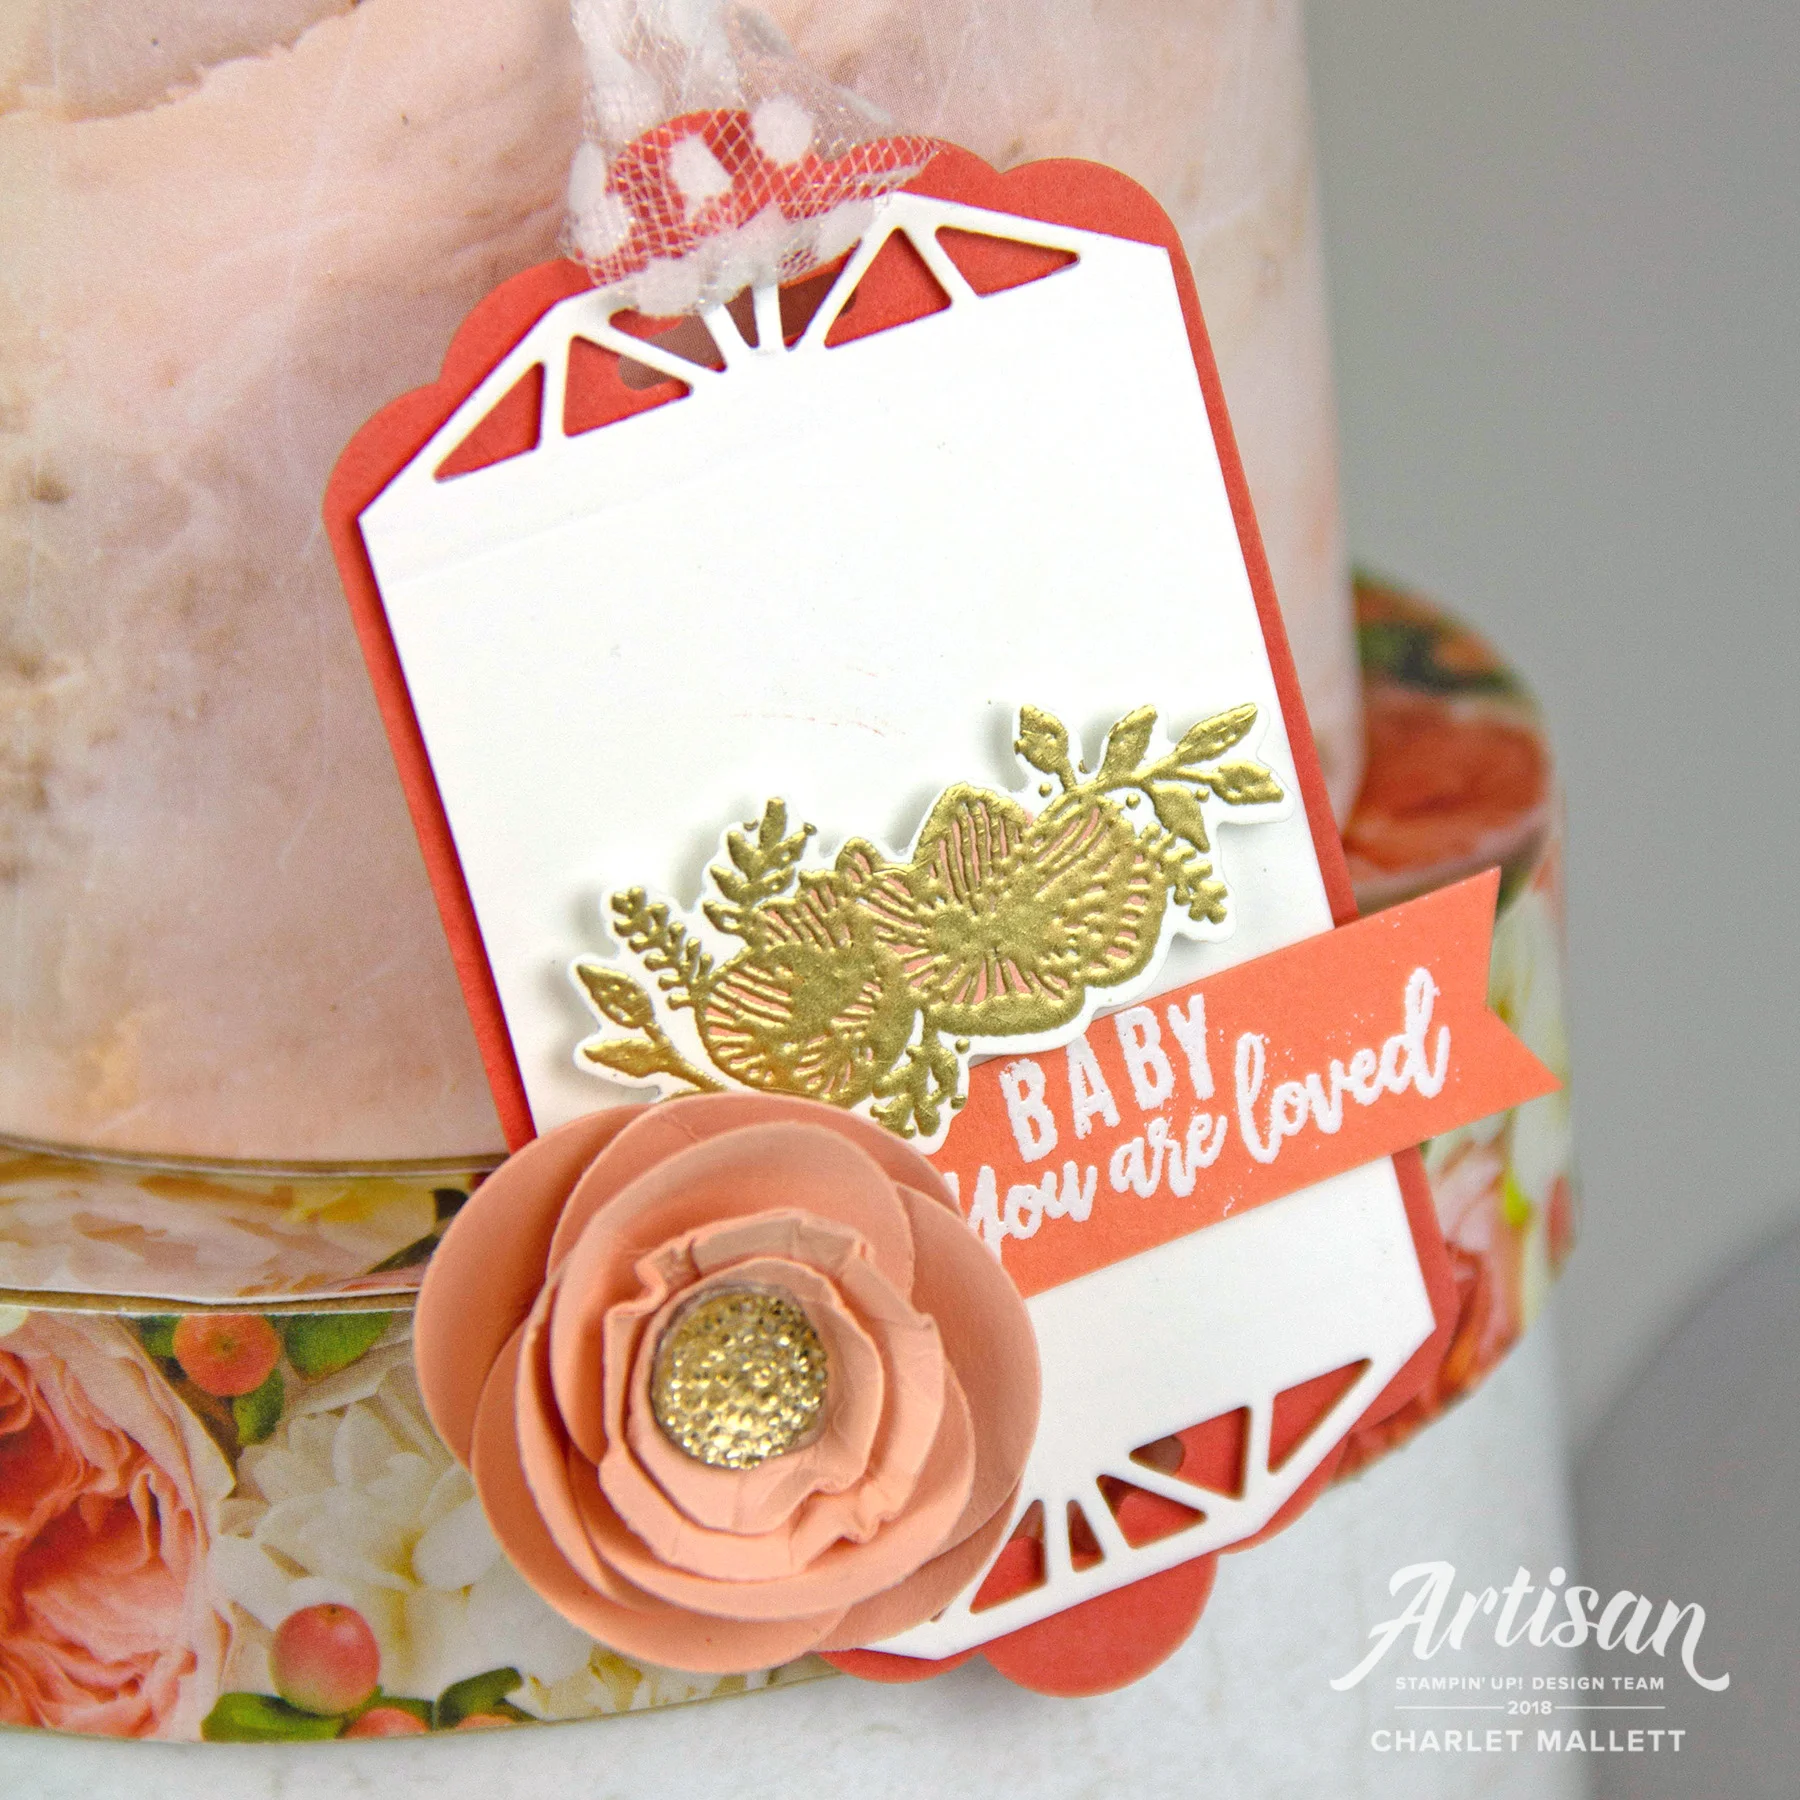
Lastly I’ve created a matching card and tag to accompany the gift. The card, tag and frame also feature the ‘Making a Difference’ alphabet stamp set. I stamped the word BABY using this set. It appears the fonts in this alphabet stamp set work perfectly with the fonts in the Petal Promenade stamp set. I love how smart Stampin’ Up! is with product coordination!

Beautiful Promenade 1a.jpg
paper flower 1 dies.jpg

I shared this tip a while back and figured it was a great time to share again. The doily shape in the Beautiful Layers dies can be used to create four distinct shapes. Cut away following the straight lines in the shape to create a hexagon, octagon and polygon. I used a variety of these shapes on my projects today.

It’s an awesome feeling when a plan comes together. If ever there was a reason to go a bit over the top it’s welcoming a new life into the world. The entire ensemble was gifted in a basket and was well received. I love gifts made from the heart. I’ll post an instagram story of the entire package soon.

A full list of supplies can be found at the end of this post.

Thanks for visiting! Up next is fellow artisan Connie Collins. She always inspires and I‘ve seen a little sneak peak and am totally WOWed. In fact, this hop is stunning. Don’t miss it. Please know I appreciate YOU and all of your lovely comments. Have a great day!

 
Bloghop_Button.jpg
 

The Artisan Design Team is a group of international Stampin' Up! demonstrators
(16) chosen by Stampin' Up! to create exclusive projects for the company.

Sometimes links break. If this happens you can catch back up
with us by clicking on our blog homepage links below.

Cathy Caines
Charlet Mallett (YOU ARE HERE)
Connie Collins
Elizabeth Price
Emma Goddard
Jenni Pauli
Jennifer Frost
Jessica Winter
Kayla MacAulay
Kim McGillis
Lauren Alaird
Linda van Wely-Zwolle
Rhoda MacPherson
Sarah Lancaster
Susan Wong
Sylwia Schreck 

Are you Interested in purchasing Stampin' Up! products? I would LOVE to be your Stampin' Up! Demonstrator. If you live in the United States you can order your paper crafting supplies from my online store. So easy. THANK YOU!

Product List
Beautiful Promenade Photopolymer Bundle
[148389]
$45.00
Petal Promenade Designer Series Paper
[146913]
$11.00
Make A Difference Photopolymer Stamp Set
[146676]
$27.00
Petal Pink Stampin' Blends Markers Combo Pack
[147272]
$9.00
Calypso Coral Stampin' Blends Markers Combo Pack
[144045]
$9.00
Calypso Coral 8-1/2" X 11" Card Stock
[122925]
$8.50
Grapefruit Grove 8-1/2" X 11" Cardstock
[146972]
$8.50
Whisper White 8-1/2" X 11" Card Stock
[100730]
$9.75
Twine Baker's Whisper White
[124262]
$3.00
Gold Stampin' Emboss Powder
[109129]
$5.00
Boxwood Wreaths Embellishments
[144176]
$6.00
Calypso Coral Classic Stampin' Pad
[147101]
$7.50
Grapefruit Grove Classic Stampin' Pad
[147142]
$7.50
Versamark Pad
Versamark Pad
[102283]
$8.50
White Stampin' Emboss Powder
[109132]
$5.00
Mini Stampin' Dimensionals
[144108]
$4.00
SNAIL Permanent Adhesive
[104332]
$7.00
Whisper White 5/8" (1.6 Cm) Polka Dot Tulle Ribbon
[146912]
$7.50
Tag Topper Scalloped Punch
[133324]
$23.00
Gold Faceted Gems
Gold Faceted Gems
[144141]
$5.00
Metallic Brads
Metallic Brads
[146929]
$4.50
In cards, stampin' up! Tags Artisan Design Team, Beautiful Promenade
9 Comments
Charlet Mallett Instagram tip 2 artisan.jpg

Easy Ombré with Stampin' Blends

September 19, 2018
Charlet Mallett Instagram tip 2a.jpg

Hello! It’s so fun to see my work featured on the Stampin’ Up! Instagram and Facebook pages. It’s a nice perk to being an Artisan Design team member. I was featured this month on SU’s instagram showing how to use your Stampin’ Blends to create an easy ombré look.

“I love the look of ombré sentiments on cards. Create this awesome look quickly & easily using Stampin’ Blends. Choose shades of similar colors and roughly color your cardstock from light to dark. Blend colors together and then die-cut your sentiment. So fun!” I hope this idea inspired you to pull out your Stampin’ Blends and use them in a different way.

This card features the Thank You thinlet die and the Love You To Pieces stamp set and die bundle. A full list of supplies can be found below.

The Stampin’ Blends colors used for this pink Thank You:

Petal Pink light
Petal Pink dark
Flirty Flamingo light
Flirty Flamingo dark
Calypso Coral light
Calypso Coral dark

Charlet Mallett Instagram tip (6 of 13).jpg
Charlet Mallett Instagram tip (7 of 13).jpg

Another quick tip: Keep the puzzle die cuts in the die, add adhesive and then adhere to the card front before you remove the die. This will keep all the puzzle pieces together and make the assembly so much easier.

Charlet Mallett Instagram tip (13 of 13).jpg

Now let’s flip it! Same idea / technique but shown in greens. This card features Thank You Thinlet and the Tropical Chic stamp set and papers.

Which do you prefer, the pink or green version? Are you ready to give it a try? I’d love to see what you make. Tag me it you try it. Happy stamping.

Charlet Mallett Instagram tip 1 artisan.jpg
Charlet Mallett Instagram tip (11 of 13).jpg
Charlet Mallett Instagram tip 1a.jpg
Product List
Love You To Pieces Clear-Mount Bundle
[148396]
$39.50
Thank You Thinlits Die
[146832]
$18.00
Frosted & Clear Epoxy Droplets
[147801]
$9.00
Petal Pink Stampin' Blends Markers Combo Pack
[147272]
$9.00
Flirty Flamingo Stampin' Blends Markers Combo Pack
[147278]
$9.00
Calypso Coral Stampin' Blends Markers Combo Pack
[144045]
$9.00
Tuxedo Black Memento Ink Pad
[132708]
$6.00
Mini Stampin' Dimensionals
[144108]
$4.00
SNAIL Permanent Adhesive
[104332]
$7.00
Calypso Coral 8-1/2" X 11" Card Stock
[122925]
$8.50
Whisper White 8-1/2" X 11" Card Stock
[100730]
$9.75
Twine Baker's Whisper White
[124262]
$3.00
In cards, Artisan Design Team, stampin' up! Tags Thank You Thinlet, Ombre, Stampin' Blends, ADT2018, Artisan Design Tip, Artisan Design Team, adttipsandtricks
Comment
Takeout Treats (3 of 6).jpg

Global Design Project - Theme Challenge #GDP155

September 10, 2018
39739166_10157775934987222_1741338960531030016_n.jpg

School Days: My youngest started back to elementary school last week making the timing for this week's Global Design Project challenge PERFECT!  I created little thank you boxes and cards to gift to a new teacher.

Our school colors are blue and gold. The closest Stampin' Up! color matches are Blueberry Bushel and Mango Melody.  Our sons teacher happens to be male so I opted to make these card a little more masculine / generic. 


Takeout Treats (2 of 6).jpg

I recall getting gold star stickers from my teachers in elementary school for jobs well done. I'm not sure this happens much anymore but everyone deserve a gold star (or three).

I used products from the Takeout Treats bundle (new in the Stampin' Up! Holiday 2018 mini) to create the card and the tiny takeout boxes. This stamp set is super fun and could be used for treats for Holiday, Valentine or really any occasion!  The star from the set has been stamped in Mango Melody and hand cut with scissors. 

Don't you just love this itty bitty star paper? It happens to be the backside of one of the Festive Farmhouse papers. It's a great companion paper for this card.

Takeout Treats (5 of 6).jpg

The tiny takeout box is so easy to cut and assemble. While the box is small I was able to fit 10 Hershey Kisses inside!

Are you ready to see what the design team has created with this School Days theme? Check out the #GDP155 Blog and play along with us. Show us your school spirit! ;)

Takeout Treats (1 of 6).jpg

Full card supplies can be found below.

Are you Interested in purchasing Stampin' Up! products? I would LOVE to be your Stampin' Up! Demonstrator. If you live in the United States you can order your paper crafting supplies from my online store. So easy. THANK YOU!

Product List
Takeout Treats Clear-Mount Bundle
[149990]
$49.50
Festive Farmhouse 12" X 12" (30.5 X 30.5 Cm) Designer Series Paper
[147820]
$11.00
Corrugated Dynamic Textured Impressions Embossing Folder
[148026]
$10.00
Frosted & Clear Epoxy Droplets
[147801]
$9.00
Gray Granite Classic Stampin' Pad
[147118]
$7.50
Blueberry Bushel Classic Stampin' Pad
[147138]
$7.50
Mango Melody Classic Stampin' Pad
[147093]
$7.50
Tuxedo Black Memento Ink Pad
[132708]
$6.00
Mini Stampin' Dimensionals
[144108]
$4.00
SNAIL Permanent Adhesive
[104332]
$7.00
Gray Granite 8-1/2" X 11" Cardstock
[146983]
$8.50
Mango Melody 8-1/2" X 11" Cardstock
[146989]
$8.50
Whisper White 8-1/2" X 11" Card Stock
[100730]
$9.75
Twine Baker's Whisper White
[124262]
$3.00
Blueberry Bushel 1/8" (3.2 Mm) Grosgrain Ribbon
[146950]
$6.00
In cards, challenge, stampin' up! Tags Global Design Project
Comment
Dashing Deer Card using the Dashing Along papers #12 - Charlet Mallett, Stampin' Up!

Dashing Deer Card using the Dashing Along papers #12 - Charlet Mallett, Stampin' Up!

Dashing Along - Stampin' Up! Artisan Blog Hop

September 6, 2018
08-01-18_header_dashing_deer_host_na.jpg
Artisan Logo.jpg

Gifts! Don't you love a good gift? The Stampin' Up! Artisan Design team has prepared a bonus hop this month featuring the Dashing Along Designer Series Paper. This hop is like unwrapping an awesome unexpected gift. So many wonderful ideas are in store for you.

I went a little crazy with my projects. There is so much Dashing Along paper I just had to USE IT UP! Before we get into my projects let me share a little about the promotion. 

09.01.18_PROMO_DASHING_DEER_HOST.jpg

The Dashing Along Host Promotion features exclusive Designer Series Paper available for a limited time only. You can earn Dashing Along Designer Series Paper with a qualifying Host order from September 1–30 ($250 USD).

The Dashing Along Designer Series Paper is a collection of beautiful, traditional Christmas paper featuring a mix of old favorites and new patterns. This assortment has an eclectic feel and is perfect for layering. You'll receive 12 sheets: 3 double-sided sheets (6 total designs); 4 sheets of each design. Plenty of paper for making those holiday cards or wrapping small gifts! The papers coordinates with the Dashing Deer bundle from the holiday catalog.

Dashing Deer & Dashing Along papers #11 - Charlet Mallett, Stampin' Up!

Dashing Deer & Dashing Along papers #11 - Charlet Mallett, Stampin' Up!

Every year, before the holidays, I prepare a "12 DAYS OF CRAFTMAS" gift set for my Mom. Basically, a crafty gift can be opened each day leading up to Christmas. Mom is an avid crafter and really enjoys this tradition. I usually gift some of my favorite crafty products from the year, wrap them up, and decorate with a cute tag. However this year I decided to use the Dashing Along Papers and Dashing Deer stamp set to wrap and decorate each little gift. It's a bit (ok, a LOT) over the top but it sure was fun to really explore these papers and uniquely dress up each package.

Dashing Deer & Dashing Along papers #1 - Charlet Mallett, Stampin' Up!

Dashing Deer & Dashing Along papers #1 - Charlet Mallett, Stampin' Up!

I'll go through each package and share a little unique tidbit or tip. First, all packages are labeled with a number for opening. I stamped these numbers all at the same time and heat embossed with copper emboss powder.  Many of the images and sentiments are also embossed in copper. Doing this all at once is a big time saver

Package for DAY 1: Deer slider

Do you reuse your wrapping paper or bags? I like to make my gift packaging reusable. Many of the packages below are able to be deconstructed and turned into a card or tag. I used the red swirl paper to wrap an ink pad with open ends on the top and bottom. This cute little copper embossed deer belly band slides over a Stampin' Classic ink pad. The pad can easily slide in and out of the belly band. I think this layout would also make a really cute holiday card.

Package for DAY 2:

This Crumb Cake cardstock box is the perfect size to house a half-sized stamp case, allowing me to fill with whatever I like later on. I took measurements from the stamp case and used the Simple Scored scoring tool to create. My favorite part of this package are the little baker's twine pom poms. I used the trusty fork method to wind the twine. This is a fun take on brown paper packages tied up with string. 

Gift Box using Dashing Along papers #2 - Charlet Mallett, Stampin' Up!

Gift Box using Dashing Along papers #2 - Charlet Mallett, Stampin' Up!

Dashing Along papers #3 - Charlet Mallett, Stampin' Up!

Dashing Along papers #3 - Charlet Mallett, Stampin' Up!

Package for DAY 3: Belly Band Shaker

Shake, shake, shake! This gift packaging holds a small package of sequins. I hand trimmed a green star from the Dashing Along papers and punched out a scalloped window in the center to line up over the center of the sequin package. It's a shaker package that actually holds sequins that can be used later! The belly band easily slides on and off the gift.

Package for DAY 4: Package slide

I've created another another belly band slider, this time using the Corrugated Dynamic Textured Impressions Embossing Folder to create a wrap for the gift. I created a mini rosette using my Simply Scored and layered with a die cut deer from the Detailed Deer thinlits and the Joyous Noel 6x6 Glimmer Paper. This gift holds the Festive Farm Wood elements.

Dashing Deer & Dashing Along papers #4 - Charlet Mallett, Stampin' Up!

Dashing Deer & Dashing Along papers #4 - Charlet Mallett, Stampin' Up!

Dashing Deer Card & Dashing Along papers #5 - Charlet Mallett, Stampin' Up!

Dashing Deer Card & Dashing Along papers #5 - Charlet Mallett, Stampin' Up!

Card for DAY 5: Warm Thoughts Deer Scene Card

It's high time I threw in a card, right?! I'm not sure what gift I'll put with this card yet but I plan to place the card in a clear cello envelope and attach to the gift. To make the white card front I used the two small deer dies from the Detailed Deer thinlits and die cut them half way by laying the top plate over the top half of the deer. I hand trimmed away the paper excess to create this snowy scene. This might be one of my favorite projects.

Dashing Deer & Dashing Along papers #6- Charlet Mallett, Stampin' Up!

Dashing Deer & Dashing Along papers #6- Charlet Mallett, Stampin' Up!

Package for DAY 6: Hanging Cone

This hanging cone cup can also serve as an ornament for a Christmas tree. It would also make a fun favor filled with treats. The shreddy was easily created using the Corrugated Dynamic Textured Impressions Embossing Folder. I embossed a 4x6 sheet of Crumb Cake cardstock and then trimmed into approximately 1/8" increments. I crinkled and crumbled with my hands and then filled the cone with as much as I needed. I am super excited about this discovery because I can now easily make matching shreddy in any cardstock color I'd like. Woohoo! 

Dashing Deer & Dashing Along papers #6 - Charlet Mallett, Stampin' Up!

Dashing Deer & Dashing Along papers #6 - Charlet Mallett, Stampin' Up!

Dashing Deer & Dashing Along papers #7 - Charlet Mallett, Stampin' Up!

Dashing Deer & Dashing Along papers #7 - Charlet Mallett, Stampin' Up!

Package for DAY 7: Baker's Twine Spool

I found of bunch of these wooden spools and have been slowly converting my baker's twine onto them. I love the idea of turning the gift into the package (like above with the shaker sequins). This gift is what you see, a cute tiny package of Baker's twine. One small detail that might not be noticed at first is the tiny white baker's twine scarf tied around the neck of the deer. It's a little hard to see in this photo.

Package for DAY 8: Ornament Tag (front & back)

This gift tag doubles as a tree ornament. Below are views from both sides. This paper rosette is created by using the Simply Scoring tool. The front side includes the number and a greeting, and the back side is a little more generic. The copper embossing around the rosette rim is created by rolling the edge of the rosette ornament along a Versamark ink pad and then dipped into embossing powder. This tag will hang off a gift, TBD.

Dashing Deer & Dashing Along papers #8 - Charlet Mallett, Stampin' Up!

Dashing Deer & Dashing Along papers #8 - Charlet Mallett, Stampin' Up!

Dashing Along 8 ornament.jpg
Dashing Deer gift box & Dashing Along papers #9 - Charlet Mallett, Stampin' Up!

Dashing Deer gift box & Dashing Along papers #9 - Charlet Mallett, Stampin' Up!

Package for DAY 9: Round box 

This box is sweet, simple and permanently wrapped in cute paper. It can be reused to hold another gift or holiday treats. This is a paper mâché box that has been covered in the designer series papers. The paper seams have been inked in coordinating ink to help hide them. What's in the box? Two shimmer paints are hidden inside. 

Package for DAY 10: Slider Deer box 

I love the look of layered elements. My fellow Artisans are PROS at layering. So, I channelled them a bit for this layered look. This slider front includes lots and lots of layers and dimension using four of the papers from the Dashing Along papers. The large deer is heat embossed in copper on Soft Suede cardstock which I think provides a rich look. This package holds the new Take Your Pick tool.

Dashing Deer & Dashing Along papers #10 - Charlet Mallett, Stampin' Up!

Dashing Deer & Dashing Along papers #10 - Charlet Mallett, Stampin' Up!

Dashing Deer Card #11 - Charlet Mallett, Stampin' Up!

Dashing Deer Card #11 - Charlet Mallett, Stampin' Up!

Card for DAY 11: White Dashing Deer card. This card is quite pretty tone on tone. I am SO in LOVE with this new Corrugated Dynamic Textured Impressions Embossing Folder! It was a little hard to sew the Corrugated paper, like sewing ruffles without pins. It's not perfect but I love the look. I've layered this Crumb Cake card onto a red wrapped package (shown in the last photo of this post).

Dashing Deer Card using the Dashing Along papers #12 - Charlet Mallett, Stampin' Up!

Dashing Deer Card using the Dashing Along papers #12 - Charlet Mallett, Stampin' Up!

Card for DAY 12: Merry Christmas card. Woohoo, here is the last and final card of the gift set. The green leaf swag was created by uncurling a Boxwood Wreath Embellishment and fluffing up the leaves. If you are interested I'll show more details on how I made this card in my first ever Facebook Live class next week - details to come, watch here.

classes.jpg

A few of my fellow Artisans will be hosting Facebook Live classes this month showing you how to create many of the projects shown on this hop. >>> Here are a few quick links to their FB pages where details about dates and times can be found.

Thanks for sticking with me through this LONG post. Below is a photo of all the packages together, and a full list of supplies used on these gifts can be found at the end of this post. Up next is the super talented Connie Collins. 

Susan Wong
Emma Goddard
Jennifer Frost
Cathy Caines
Kayla MacAulay
Elizabeth Price
Charlet Mallett
Jennifer Pauli
12 Days of Craftmas using Dashing Deer & Dashing Along papers - Charlet Mallett, Stampin' Up!

12 Days of Craftmas using Dashing Deer & Dashing Along papers - Charlet Mallett, Stampin' Up!

Please know I appreciate YOU and all of your lovely comments. Have a great day!

 
Bloghop_Button.jpg
 

The Artisan Design Team is a group of international Stampin' Up! demonstrators
(16) chosen by Stampin' Up! to create exclusive projects for the company. You can catch up
with us anytime by clicking on our blog homepage links below.

Cathy Caines
Charlet Mallett (YOU ARE HERE)
Connie Collins
Elizabeth Price
Emma Goddard
Jenni Pauli
Jennifer Frost
Jessica Winter
Kayla MacAulay
Kim McGillis
Lauren Alaird
Linda van Wely-Zwolle
Rhoda MacPherson
Sarah Lancaster
Susan Wong
Sylwia Schreck 

Are you Interested in purchasing Stampin' Up! products? I would LOVE to be your Stampin' Up! Demonstrator. If you live in the United States you can order your paper crafting supplies from my online store. So easy. THANK YOU!

Product List
Dashing Along Designer Series Paper
[149903]
$11.00
Dashing Deer Clear-Mount Bundle
[149935]
$50.25
Corrugated Dynamic Textured Impressions Embossing Folder
[148026]
$10.00
Joyous Noel 6" X 6" Glimmer Paper
[147817]
$15.00
Pearlized Doilies
Pearlized Doilies
[146936]
$4.50
Copper Stampin' Emboss Powder
[141636]
$5.00
Crumb Cake 8-1/2" X 11" Card Stock
[120953]
$8.50
Soft Suede 8-1/2" X 11" Card Stock
[115318]
$8.50
Whisper White 8-1/2" X 11" Card Stock
[100730]
$9.75
Tuxedo Black Memento Ink Pad
[132708]
$6.00
Mini Stampin' Dimensionals
[144108]
$4.00
SNAIL Permanent Adhesive
[104332]
$7.00
Simply Scored
Simply Scored
[122334]
$30.00
Versamark Pad
Versamark Pad
[102283]
$8.50
Cherry Cobbler 1/4" Double-Stitched Ribbon
[144117]
$7.00
Garden Green & White Baker's Twine
[147814]
$4.00
Twine Baker's Whisper White
[124262]
$3.00
Pearl Basic Jewels
Pearl Basic Jewels
[144219]
$5.00
1-1/8" (2.9 Cm) Scallop Circle Punch
[146138]
$16.00
Subtle Dynamic Textured Impressions Embossing Folder
[143706]
$10.00
Boxwood Wreaths Embellishments
[144176]
$6.00
3/16" (1 Cm) Braided Linen Trim
[147808]
$7.00
Layering Ovals Framelits Dies
[141706]
$35.00
Metallic Brads
Metallic Brads
[146929]
$4.50
Gold Faceted Gems
Gold Faceted Gems
[144141]
$5.00
In cards, stampin' up! Tags Artisan Design Team
12 Comments
← Newer Posts Older Posts →
This blue and purple winter card uses tidbits from the Calm & Bright kit. I used the negative shape from the fir die cut to create a stencil and layered from there. Blend, stencil, stamp. Colors are Highlander Heather, Cloud Cover, & Lost Lagoon. @global_design_project #gdp525 #stampinup #calmandbright
Masking and stamping! On this card I mask with tape, blend ink, then stamp, then stencil, and stamp again to create a layered scene. It’s so satisfying to remove the masking tape… always a fun reveal. Card created for @global_design_project Stamp set is ‘Keeping Traditions’ Stencil is made from the negative die cut fir shape from the ‘Calm & Bright’ kit. #stampinup #cardmakingreels #cardmaker
Make Merry! I love pops of red and green with aqua for a holiday cards. Feel so fresh! 

I used the Keeping Traditions stamp set and leftover pieces from the Calm & Bright kit to create this card for #gdp524 - we are CASEing @herzundhandgemacht o
Make Merry! I love pops of red and green with aqua for a holiday cards. Feel so fresh! I used the Keeping Traditions stamp set and leftover pieces from the Calm & Bright kit to create this card for #gdp524 - we are CASEing @herzundhandgemacht over @global_design_project #stampinup #keepingtraditionstampset
Sending Joy! I created this wintry scene using the Calm and Bright card kit. I love the look of white on white. I pulled in some gold embossing and Crumb Cake to balance out all that white. This CAS kit has tons of cute and tiny elements (yippee for tiny stamps) that are perfect for creating an adorable little holiday scene. 166461 Card created for @global_design_project BRRR theme. #gdp523 #stampinup #cardmaker #cardmaking #cardmakersofinstagram #cardmakingreels #madewithmine
This blue and purple winter card uses tidbits from the Calm & Bright kit. I used the negative shape from the fir die cut to create a stencil and layered from there.  Blend, stencil, stamp. Colors are Highlander Heather, Cloud Cover, &  Lost L
Masking and stamping! On this card I mask with tape, blend ink, then stamp, then stencil, and stamp again to create a layered scene. It’s so satisfying to remove the masking tape… always a fun reveal. Card created for @global_design_proj
Make Merry! I love pops of red and green with aqua for a holiday cards. Feel so fresh! 

I used the Keeping Traditions stamp set and leftover pieces from the Calm & Bright kit to create this card for #gdp524 - we are CASEing @herzundhandgemacht o
Sending Joy! I created this wintry scene using the Calm and Bright  card kit. I love the look of white on white. I pulled in some gold embossing and Crumb Cake to balance out all that white. This CAS kit has tons of cute and tiny elements (yippee for

All Stampin’ Up! images are copyright © 1990-2025 Stampin' Up!

Posts prior to 2013 can be found on charletswebsite

PAPER PUMPKIN  - SUBSCRIBE!

PAPER PUMPKIN - SUBSCRIBE!

Featured
IMG_2476.jpg
Sep 24, 2025
Halloween INSPO
Sep 24, 2025
Read More →
Sep 24, 2025
CraftRoulette-contribution-276.jpg
Jul 18, 2025
Craft Roulette! - Guest July 18th
Jul 18, 2025
Read More →
Jul 18, 2025
IMG_3118 6x6.jpg
Feb 20, 2025
I love you more than ... French Fries!
Feb 20, 2025
Read More →
Feb 20, 2025
Blog_Badge.jpg

Subscribe

Sign up with your email address to receive news and updates.

We respect your privacy.

Thank you!
Only Available at Scrapbook.com!
EVO Synthtic Paper

Powered by Squarespace