• Blog
  • SHOP STAMPIN' UP!
  • JOIN MY TEAM
  • Recipe Project
  • About
  • Contact
Menu

Painted Orange

Charlet Mallett • Paper Crafter • Designer • Stampin' Up! Independent Demonstrator
  • Blog
  • SHOP STAMPIN' UP!
  • JOIN MY TEAM
  • Recipe Project
  • About
  • Contact

Tutorial Medley - Charming Sentiments

September 15, 2022

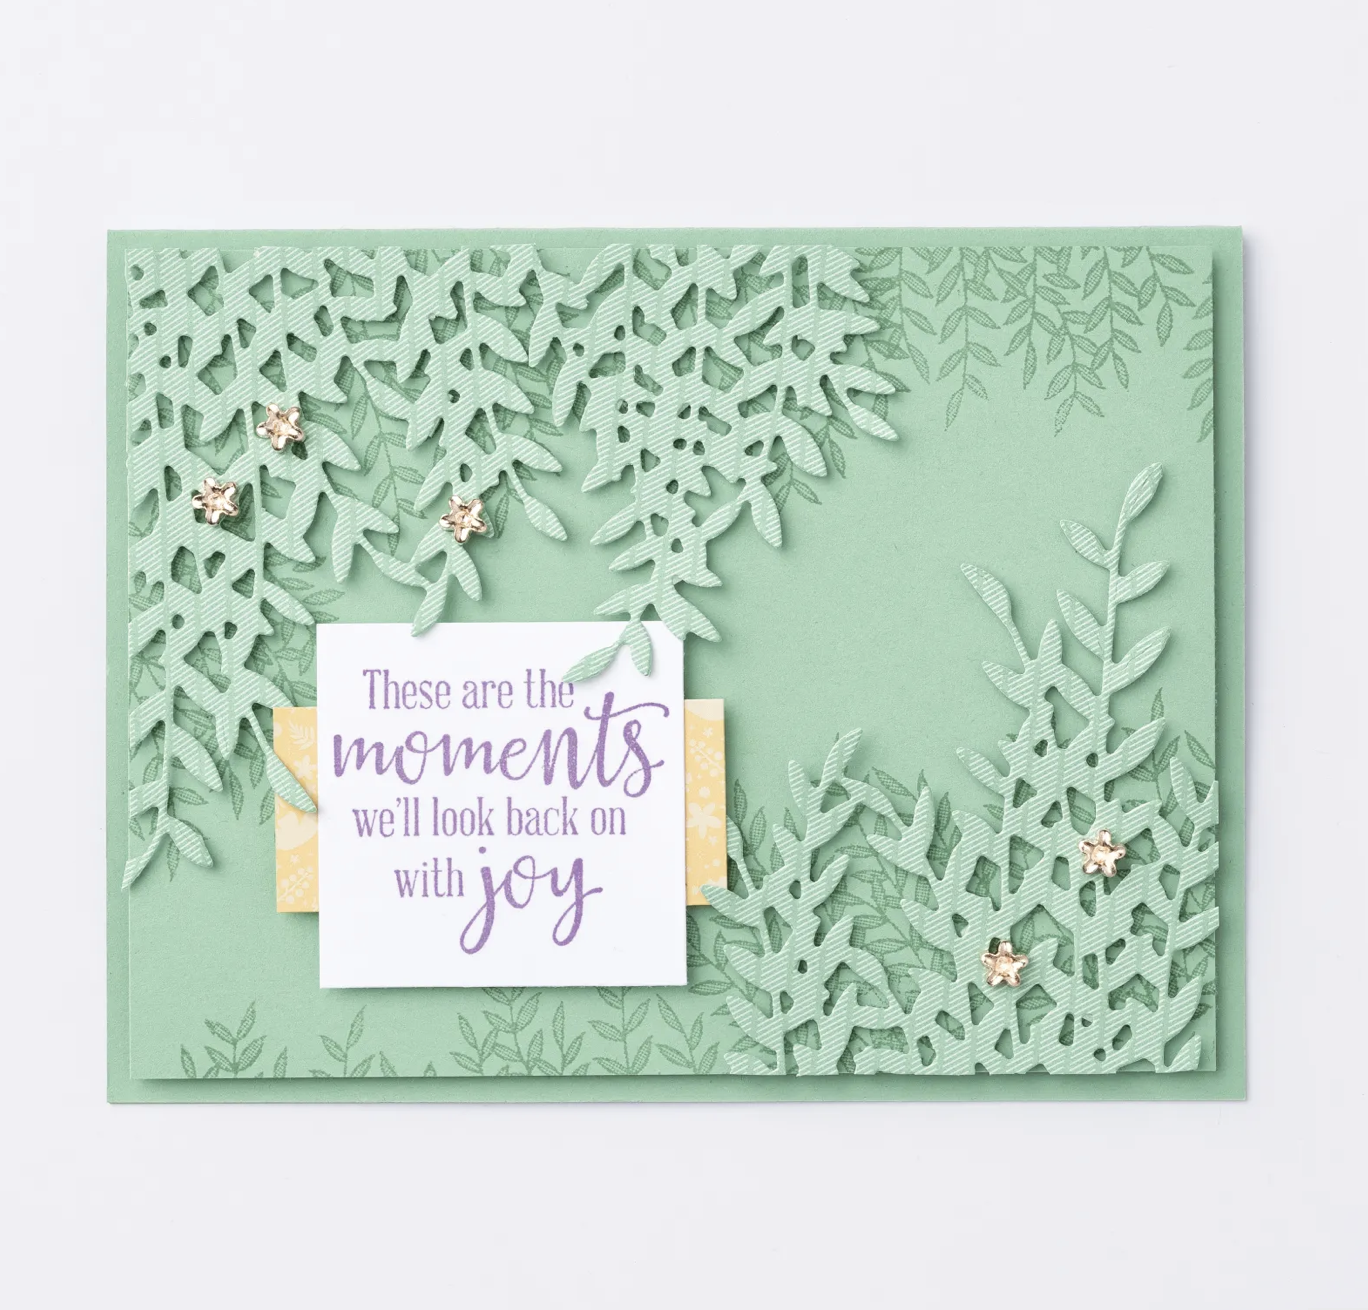
Welcome to the September tutorial Medley. This month we each chose one project from the Stampin’ Up! catalog to CASE. I am casing the project featuring the Willow Tree Bundle (shown to the right). This original card can be found on page 167 of the 2022-2023 Stampin’ Up! Catalog.

Project instructions are below.

Measurements: 

·      Card Base: Highland Heather 5.5" x 8.5" folded to 5.5" x 4.25"  

·      Layer #2: Highland Heather 5.25" x 4"

·      Layer #3: Highland Heather 5.5" x 4.25" (x3)

Instructions:

·      Cut and score card base. Fold in half using a bone folder.

·      Die cut three Enchanting Detail Floral borders from Highland Heather cardstock.

·      Cut a piece of Highland Heather cardstock to 5.25" x 4" (layer 2). Use one of the Enchanting Detail die cuts as a stencil and layer over top right corner. Using a blending brush add Highland Heather ink over makeshift stencil. Repeat this process in bottom left corner.

·      Center and mount layer 2 onto card base.

·      Take remaining two Enchanting Detail Floral border and adhere together to make one thick piece. Mount to top left corner of card – layer 3.

·      Stamp sentiment from Charming Sentiments in Tuxedo black ink onto Basic White cardstock. Die cut out using coordinating die.

·      Cut a piece of Rose Gold ribbon to 4”. Fold in half and adhere to card. See card for placement.

·      Adhere die cut sentiment on top of ribbon using Stampin’ Dimensionals.

·      Add Iridescent Rhinestones to card front. See card example for placement.

Product List
Charming Sentiments Bundle (English)
[158734]
$52.00
Enchanting Details Dies
[159166]
$33.00
Iridescent Rhinestones Basic Jewels
[158130]
$7.50
Rose Gold & White 5/8" (1.6 Cm) Striped Ribbon
[159194]
$8.00
Bone Folder
Bone Folder
[102300]
$7.00
Stampin' Seal
Stampin' Seal
[152813]
$8.00
Stampin' Dimensionals
[104430]
$4.25
Basic White 8 1/2" X 11" Cardstock
[159276]
$10.25
Tuxedo Black Memento Ink Pad
[132708]
$6.00
Highland Heather 8-1/2" X 11" Cardstock
[146986]
$9.25
Highland Heather Classic Stampin' Pad
[147103]
$8.00
Blending Brushes
Blending Brushes
[153611]
$12.50
Add All to Cart
Tags Tutorial Medley, Charming Sentiments, Enchanting Details
Comment

Tutorial Medley - Amazing Phrasing

August 15, 2022

Welcome to the August tutorial Medley. This month I am showcasing the Amazing Phrasing Saleabration stamp set. I’ve paired it with the Bewitching stamp set to make this funny card. If you purchase the supplies to make this card you are on your way to earning the Amazing Phrasing Stamp set for free. Message me for details.

Project instructions are below.

Measurements: 

·      Card Base: Basic White 4.25" x 11" folded to 4.25" x 5.5"

·      Layer #2: Fluid 100 Watercolor paper 3” x 4”


Instructions:

·      Cut and score card base. Fold in half using a bone folder.

·      Stamp the star image from Bewitching in the bottom right and top left corners of the card base. Stamp three times to create a cluster of stars.

·      Cut a piece of Fluid 100 cardstock to 3”x5”. Create a watercolor wash and drop in Orchid Oasis color around the outside edges of the wash using a water brush. Set aside and let dry.  Once dry trim down to 2”x3”.

·      Stamp ‘OOPS’ from Amazing Phrasing in Tuxedo black ink onto the Orchis Oasis watercolor fluid paper. Center and stamp on the top portion.

·      Stamp ‘I’m the worst’ from Amazing Phrasing in Tuxedo black ink onto the Orchis Oasis watercolor fluid paper under the OOPS sentiment.

·      Stamp ‘spider image’ from Bewitching stamp set in Tuxedo black ink onto the Orchis Oasis watercolor fluid paper hanging from the M.

·      Mount to card front using Stampin’ Dimensionals in top right corner of card approximately ¾” from top and side.

·      Stamp the witch hat from Bewitching stamp in Tuxedo Black ink onto Basic White cardstock. Punch out using coordinating witch hat punch. Center and mount to watercolor piece on card front. See card photo for placement suggestion.

·      Using the witch hat punch out six stars from Crushed Curry cardstock. Adhere to card front around stamped stars. See card photo for placement suggestion.

·      Add dots of white Pearlized Enamel Effects to the negative spaces around the stamped stars.

Product List
Amazing Phrasing Photopolymer Stamp Set (English)
[159930]
Bewitching Bundle (English)
[159857]
Orchid Oasis Classic Stampin' Pad
[159214]
Water Painters
Water Painters
[151298]
Tuxedo Black Memento Ink Pad
[132708]
Crushed Curry Classic Stampin' Pad
[147087]
Pearlized Enamel Effects Basics
[156310]
Fluid 100 Watercolor Paper
[149612]
Basic White 8 1/2" X 11" Cardstock
[159276]
Crushed Curry 8-1/2" X 11" Cardstock
[131199]
Bone Folder
Bone Folder
[102300]
Stampin' Dimensionals
[104430]
Stampin' Seal
Stampin' Seal
[152813]
Add All to Cart
Tags Global Design Project, Tutorial Medley, Amazing Phrasing, Bewitching
Comment

Tutorial Medley - Fresh Cut Flowers

July 15, 2022

Welcome to the July tutorial Medley. This month I am showcasing the Fresh Cut Flowers stamp set and 2022-24 Incolors. Project instructions are below.

Measurements: 

·      Card Base: Tahitian Tide 4.25" x 11" folded to 4.25" x 5.5"

·      Layer #2: Tahitian Tide DSP 4" x 5.25"


Instructions:

·      Cut and score card base. Fold in half using a bone folder.

·      Cut a piece of Tahitian Tide plaid designer series paper to 4" x 5.25". Set aside until after next step.

·      Die cut Basic White cardstock using the large scallop frame from the Scallop Contours Dies.

·      Take the die cut scallop paper and turn it so one corner is facing down. Center and mount to Plaid Tahitian Tide DSP creating a triangle apron.

·      Trim off any excess of scallop from back side so finished piece measures 4" x 5.25". Center and mount to card front.

·      Stamp large flower image in Tuxedo Black Memento Ink onto basic White cardstock.

·      Color flower image using Flirty Flamingo and Parakeet Party Stampin' Blends.

·      Hand cut out large flower image.

·      Center and mount flower image to card front using Stampin’ Dimensionals.

·      Stamp sentiment in Tuxedo Black Memento Ink onto a piece of Parakeet Party Cardstock. Trim to approximately .25" x 3.5". Center and mount on top of flower image.

·      Add multiple brushed butterflies to card front. See card for placement suggestion.

Product List
Fresh Cut Flowers Cling Stamp Set
[159018]
$22.00
Scalloped Contours Dies
[155560]
$35.00
2022–2024 In Color™ 6" X 6" (15.2 X 15.2 Cm) Designer Series Paper
[159253]
$12.00
Flirty Flamingo Stampin' Blends Combo Pack
[154884]
$9.00
Parakeet Party Stampin' Blends Combo Pack
[159220]
$9.00
Brushed Brass Butterflies
[158136]
$10.00
Tahitian Tide 8 1/2" X 11" Cardstock
[159261]
$9.25
Parakeet Party 8 1/2" X 11" Cardstock
[159259]
$9.25
Basic White 8 1/2" X 11" Cardstock
[159276]
$10.25
Tuxedo Black Memento Ink Pad
[132708]
$6.00
Stampin' Dimensionals
[104430]
$4.25
Stampin' Seal
Stampin' Seal
[152813]
$8.00
Bone Folder
Bone Folder
[102300]
$7.00
Add All to Cart
Tags Global Design Project, Tutorial Medley, Fresh Cut Flowers
Comment

Tutorial Medley - Sending Smiles

June 15, 2022

Welcome to the June tutorial Medley. This month I am showcasing the Sending Smiles stamp set. Project instructions are below.

Measurements: 

·      Card Base: Orchid Oasis 4.25 x 11” folded to 4.25” x 5.5”

·      Layer #2: Orchid Oasis 3.75” x 5”


Instructions:

·      Cut and score card base. Fold in half using a bone folder.

·      Die cut a 2.5” Circle from masking paper. Center circle mask left to right about 1” from top and adhere to layer #2 (Orchid Oasis 3.75” x 5”).

·      Blending white ink around the circle edge of the mask. Remove mask to reveal circle shape.

·      Emboss layer #2 using Timeworn Type embossing folder.

·      Mount layer #2 to card front using Stampin’ Dimensionals.

·      Stamp flowers in Sweet Sorbet.

·      Stamp stems in Parakeet Party.

·      Stamp flower centers in Daffodil Delight.

·      Die cut all flower pieces. Assemble the flowers together on card front.

·      Die cut the larger “sending” from Orchid Oasis cardstock. Die cut the dainty “sending” in Basic White cardstock. Layer and adhere together.

·      Mount “sending’ to card front (over flower stems) using Stampin’ Dimensionals.

·      Stamp “smiles across miles” sentiment in black on Basic White. Die cut using larger frame.

·      Mount “smiles across miles’ to card front (under the Sending die cut) using Stampin’ Dimensionals.

·      Add multiple Orchid Oasis matte dots to card front. See card for placement.

Product List
Sending Smiles Bundle (English)
[158707]
$49.50
2022 2024 In Color Matte Decorative Dots
[159186]
$8.00
Layering Circles Dies
[151770]
$35.00
Timeworn Type 3 D Embossing Folder
[156505]
$10.00
Stampin' Up! Masking Paper
[155480]
$7.00
Basic White 8 1/2" X 11" Cardstock
[159276]
$10.25
Orchid Oasis 8 1/2" X 11" Cardstock
[159267]
$9.25
Sweet Sorbet Classic Stampin' Pad
[159216]
$8.00
Parakeet Party Classic Stampin' Pad
[159208]
$8.00
Daffodil Delight Classic Stampin' Pad
[147094]
$8.00
Stampin' Seal
Stampin' Seal
[152813]
$8.00
Stampin' Dimensionals
[104430]
$4.25
Bone Folder
Bone Folder
[102300]
$7.00
Take Your Pick
Take Your Pick
[144107]
$10.00
Uninked Stampin’ Craft Pad & Whisper White Refill
[147277]
$9.50
Blending Brushes
Blending Brushes
[153611]
$12.50
Tuxedo Black Memento Ink Pad
[132708]
$6.00
For Everything Fancy Sequins
[159187]
$15.00
Add All to Cart
Tags Global Design Project, Tutorial Medley, Sending Smiles
Comment
Older Posts →
This blue and purple winter card uses tidbits from the Calm & Bright kit. I used the negative shape from the fir die cut to create a stencil and layered from there. Blend, stencil, stamp. Colors are Highlander Heather, Cloud Cover, & Lost Lagoon. @global_design_project #gdp525 #stampinup #calmandbright
Masking and stamping! On this card I mask with tape, blend ink, then stamp, then stencil, and stamp again to create a layered scene. It’s so satisfying to remove the masking tape… always a fun reveal. Card created for @global_design_project Stamp set is ‘Keeping Traditions’ Stencil is made from the negative die cut fir shape from the ‘Calm & Bright’ kit. #stampinup #cardmakingreels #cardmaker
Make Merry! I love pops of red and green with aqua for a holiday cards. Feel so fresh! 

I used the Keeping Traditions stamp set and leftover pieces from the Calm & Bright kit to create this card for #gdp524 - we are CASEing @herzundhandgemacht o
Make Merry! I love pops of red and green with aqua for a holiday cards. Feel so fresh! I used the Keeping Traditions stamp set and leftover pieces from the Calm & Bright kit to create this card for #gdp524 - we are CASEing @herzundhandgemacht over @global_design_project #stampinup #keepingtraditionstampset
Sending Joy! I created this wintry scene using the Calm and Bright card kit. I love the look of white on white. I pulled in some gold embossing and Crumb Cake to balance out all that white. This CAS kit has tons of cute and tiny elements (yippee for tiny stamps) that are perfect for creating an adorable little holiday scene. 166461 Card created for @global_design_project BRRR theme. #gdp523 #stampinup #cardmaker #cardmaking #cardmakersofinstagram #cardmakingreels #madewithmine
This blue and purple winter card uses tidbits from the Calm & Bright kit. I used the negative shape from the fir die cut to create a stencil and layered from there.  Blend, stencil, stamp. Colors are Highlander Heather, Cloud Cover, &  Lost L
Masking and stamping! On this card I mask with tape, blend ink, then stamp, then stencil, and stamp again to create a layered scene. It’s so satisfying to remove the masking tape… always a fun reveal. Card created for @global_design_proj
Make Merry! I love pops of red and green with aqua for a holiday cards. Feel so fresh! 

I used the Keeping Traditions stamp set and leftover pieces from the Calm & Bright kit to create this card for #gdp524 - we are CASEing @herzundhandgemacht o
Sending Joy! I created this wintry scene using the Calm and Bright  card kit. I love the look of white on white. I pulled in some gold embossing and Crumb Cake to balance out all that white. This CAS kit has tons of cute and tiny elements (yippee for

All Stampin’ Up! images are copyright © 1990-2025 Stampin' Up!

Posts prior to 2013 can be found on charletswebsite

PAPER PUMPKIN  - SUBSCRIBE!

PAPER PUMPKIN - SUBSCRIBE!

Featured
IMG_2476.jpg
Sep 24, 2025
Halloween INSPO
Sep 24, 2025
Read More →
Sep 24, 2025
CraftRoulette-contribution-276.jpg
Jul 18, 2025
Craft Roulette! - Guest July 18th
Jul 18, 2025
Read More →
Jul 18, 2025
IMG_3118 6x6.jpg
Feb 20, 2025
I love you more than ... French Fries!
Feb 20, 2025
Read More →
Feb 20, 2025
Blog_Badge.jpg

Subscribe

Sign up with your email address to receive news and updates.

We respect your privacy.

Thank you!
Only Available at Scrapbook.com!
EVO Synthtic Paper

Powered by Squarespace