5 hours

Too many toys, too much mess. I set to organizing Nic's room and "de-toying" the house today.

All the toys shown dumped on the floor in Nic's room were in random places all over the house. Once gathered we needed to sort, purge and organize. This task turned out to be a 5 hour job.

Every room in our house needs this exercise. You'd think with me being around the house more often it'd be cleaner but the opposite is true.

One down...


Hat trick! and other highlights.

We've been buried with spring sport games and practices lately - maybe why I've been behind on the blogging.  We missed updating you on Chris' 40th birthday, Easter and other goodies. I'll do a bit of catch up over the next few days but first a few sports updates:

Ben = soccer, Andrew = Baseball, Nicholas = gym playgroup. It really is a whole lot of fun.


Today we enjoyed our first outdoor soccer game for the spring season.  Ben usually plays defense but today he got an opportunity to play offense (forward).  He scored 3 goals!  He may get more chances in the future.  The final score was 4/2 gladiators. Yeah Ben!!!  Before the game Chris promised Ben a cartwheel if he scored a goal. I wonder if this motivation had anything to do with the hat trick?  Ben is waiting for Chris to pay up.  PAY UP CHRIS!

A few weeks back we headed to Vegas for a 3 game baseball tournament for Andrew's Spartan team.  Andrew's team is beginning to gel after an entire winter of indoor practices.  Andrew pitched and played first base.  He pitched around 120 over the weekend, a bit too much, but did really well. His arm was sore.


I signed Nicholas up for a few different sports playgroups.  This month is "gym" games.  He is learning to play well with others and follow directions. Freeze tag is a hard concept - that boy just wants to RUN!

Loving the life of a boys mom. Did I mention it's cold watching spring sports? Hmmm.


I heart projects


I really should have posted this back in February when I made this but better late than never.

Again, inspired by a Paula project (which she kind of cased from the SU catalog) I set to work to copy and made this heart.
1. I gathered up all things pink and red in my craft room.
2. Started to make all sorts of little embellishments.
3. I cut out a piece of chipboard in the heart shape I wanted.
4. Set to work arranging...   After I was pleased with the arrangement I hot glued down to to the chipboard heart.
5. pinned to cork board frame.

I took this project to my February card club because I found it showcased paper and embellishments in a different way.  Fun stuff.

Book print wreath


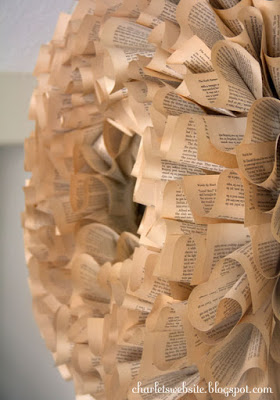
I've had wreath envy for some time now.  Weird, I know.

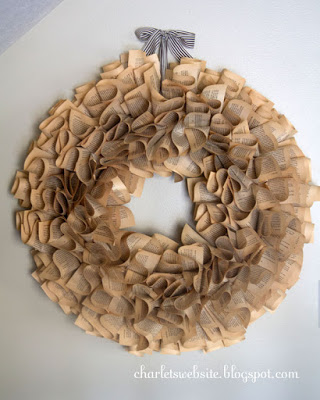
I recently visited Paula and was inspired by all of her home decor.  Much of her decor is hand made and so cute.  She was given a book print wreath when she worked at Stampin' Up! and I recall then that I wanted one too.  During our visit I got a closer look and decided I was going to make one.  After I left I looked online and found many examples of book wreaths but none were as cool as Paula's. Good thing I snapped phone pictures of hers...  I referenced them many, many, times.

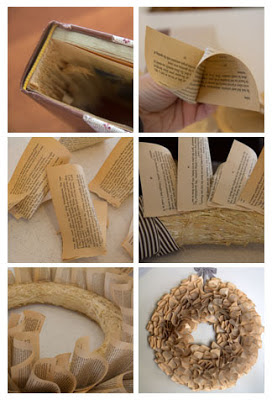
All you need is a wreath base, an old book, stapler and glue gun. It turned out to be fairly easy and just a little time consuming.  My wreath took about 3 hours.  Here are the steps I took if you are interested in making one too.

1. Find and old book you don't care about destroying.  I found a couple of great old readers digest books at the DI (thrift store). The good thing about the readers digest books is that they were printed on CHEAP paper and so the pages are yellowed as if the book is much older.

2.  Find a wreath (again found at the DI).  Doesn't matter what it looks like because you will cover it completely. Attach ribbon to the wreath. I found this easier to do first than attaching to the back after.

3. Tear out all of the pages in the book. My wreath took over 500 pages.

4. Roll fold each page in an S shape and staple once at the bottom (torn end).

5. Start at the back of the wreath and hot glue each folded page around the wreath. Continue gluing, moving the pages forward until it fills up.

6. Randomly fill in pages to make the wreath look a little less organized.  Look for holes and fill in the holes.

7.  Hang.


I enjoyed this so much that I made a smaller version for Kylene's birthday.  For that wreath I tore out pages and cut them in half, again about 250 pages, 500 sheets once cut - this worked perfect for a smaller wreath (time 1.5 hours).

Next I want to make a burlap wreath...